The first post of this series was a map of what changed in the develop branch. This one is about where your labs live and how they move: the files that Virtualbricks writes and what they look like, the workspaces, and the export and import of a project.
Where things are
Virtualbricks 2.1 kept its settings in ~/.virtualbricks.conf and each project in a folder of ~/.virtualbricks, with a .project file. While the bricks ran, their sockets were created in the same folder:
~/.virtualbricks.conf          the settings, an INI file
~/.virtualbricks/              the workspace
├── vimages/
└── lab/
    ├── .project               the project, in a format of its own
    ├── .project~ .project.back
    ├── README
    ├── vm1_hda.cow            a private disk
    └── sw1.ctl sw1.mgmt …     the sockets of the running bricks
/tmp/vb.lock                   one lock for the whole machine
Virtualbricks 3.0 splits the files by who owns them and how long they live, in the folders of the XDG specification:
~/.config/virtualbricks/settings.toml     your preferences
~/.local/state/virtualbricks/state.toml   what it remembers
~/.virtualbricks/                         the workspace, where it was
├── .virtualbricks.lock
├── shared_images/                        the images its projects share
└── lab/
    ├── project.toml                      the project
    ├── README.md                         now Markdown
    └── vm1_hda.cow                       a private disk
/run/user/1000/virtualbricks/KEY/lab/     the sockets, gone at logout
- settings.toml has your preferences, the ones that aren't about a project: the workspace, the terminal, KSM, the tray icon and the audio driver of QEMU. Opening a project no longer rewrites it.
- state.toml is what Virtualbricks remembers between runs: the project that was open last in each workspace.
- project.toml has everything about the project: its bricks, its events, its disk images, how they are connected, and its own settings, as the folders of QEMU and VDE. A project no longer depends on the settings of the computer that opens it, and a new project starts with a copy of the settings of the open one.
- The sockets move to your runtime folder. They no longer end up in copies and exports, a deep workspace no longer makes their paths longer than the 107 bytes that Linux allows, and they are removed when you log out.
One format for every file
In 2.1 the settings were an INI file and the projects a format of their own: a section for each brick, values written as text, booleans as *, lists as Python literals, and the connections in link lines whose order decided which card was the first one of a machine:
[Image:martin]
path=/vimages/vtatpa.martin.qcow2

[Qemu:sender]
hda=martin
kvm=*
privatehda=*

[Switch:sw1]

link|sender|sw1_port|rtl8139|00:aa:79:71:be:61
Now every file is TOML 1.0. The same lab, shortened, as Virtualbricks 3.0 writes it:
# The version of the layout of this file
format = 1

[images.martin]
# The image file; a relative path is relative to the project folder
# (default empty)
path = "/home/alice/.virtualbricks/shared_images/vtatpa.martin.qcow2"

[bricks.sender]
# A virtual machine, run by QEMU
type = "qemu"
# Use KVM when the host has it (default false)
use_kvm = true
# Memory in MiB (1-99999; default 64)
memory = 64  # default

[bricks.sender.disks.hda]
# The image of the disk, by name (default empty)
image = "martin"
# Write to a private copy in the project folder, not the image (default false)
private = true

[[bricks.sender.nics]]
# The kind of card: plug, socket or hostonly
kind = "plug"
# The socket it's plugged into
connect = "sw1"
# The model of the card, as QEMU names it
model = "rtl8139"
# The MAC address
mac = "00:aa:79:71:be:61"
What changed:
Every file explains itself. Above each key a comment says what it is for, its range or its choices, and its default. A value at its default is marked # default, so you see at a glance what was set.
Every value is written, the defaults too. When a default changes in a new version, your projects keep the values they had.
Keys in words. qemupath is now qemu_path, numports is ports, ram is memory, pon_vbevent is on_start.
Real types and real structure. Booleans are true and false. Each disk of a machine is a table of its own; the network cards are a list, in the order the guest sees them; the two ends of a wire are named, left and right; the states of a Netemu link are a list of tables, with the transition matrix beside them.
The actions of an event are a list of tables, so a renamed brick is renamed in the events that start it:
actions = [
    {kind = "start", target = "sw1"},
    {kind = "console", command = "brick set vm1 memory=1024"},
    {kind = "shell", command = "logger lab started"},
]
A version in each file. Every file starts with format. A file written by a newer Virtualbricks is not read, and never overwritten.
Lenient reading. A missing key takes its default; a value of the wrong type or out of range takes its default; an unknown key is ignored. Each problem is reported in the Logs window, with the key it is about, and Virtualbricks carries on. A file that isn't valid TOML is not read at all, and not overwritten either.
Safe writing. A new file is written next to the old one and renamed over it once it's complete, so a crash never leaves half a project.
You can edit these files by hand, but not while Virtualbricks runs: it saves the open project every three minutes, and your changes would be lost. The manual page virtualbricks-config(5) describes every key of every file.
Workspaces
A workspace is a folder of projects. It has its own shared images, the images its projects share, in shared_images, and its own lock. It's ~/.virtualbricks unless you choose another in the settings, or for a single run:
virtualbricks --workspace ~/courses/net101
The folder is made if it isn't there, and the workspace setting stays as it was. Each workspace reopens the project that was open last in it, so a workspace for each course, client or experiment keeps its labs, and its images, apart from the others.
Two Virtualbricks can run side by side, each in its workspace. Each has its lock, its runtime folder and its control socket, so two projects with the same name in two workspaces don't get in each other's way:
virtualbricks --no-gui --no-term --listen --workspace ~/labs/a &
virtualbricks --no-gui --no-term --listen --workspace ~/labs/b &
virtualbricks --workspace ~/labs/b --command status
How many may run at once is chosen with --lock:
- system
- One on the machine, whoever runs it: the default, as in 2.1.
- user
- One for each user, on a machine you share.
- workspace
- One for each workspace: the default with --workspace.
- none
- No limit.
In every mode but none, a Virtualbricks also holds the lock of its workspace, so two never share one, even a folder that two users share. When a start is refused, the message says which process holds the lock, and whose it is.
The Projects window
Projects › Projects… (Ctrl+O) opens one window for everything you do with your projects. The list, sorted by last use, shows the name of each project, the first line of its README, and a line of facts: its bricks and when it was used last. A project whose images are missing, or whose file can't be read, says so there. Typing filters the list by name and by description.
The details of the selected project add its README, rendered, its bricks by type, its events, each image and whether it's on this computer, and the space taken by the private disks and by the other files.
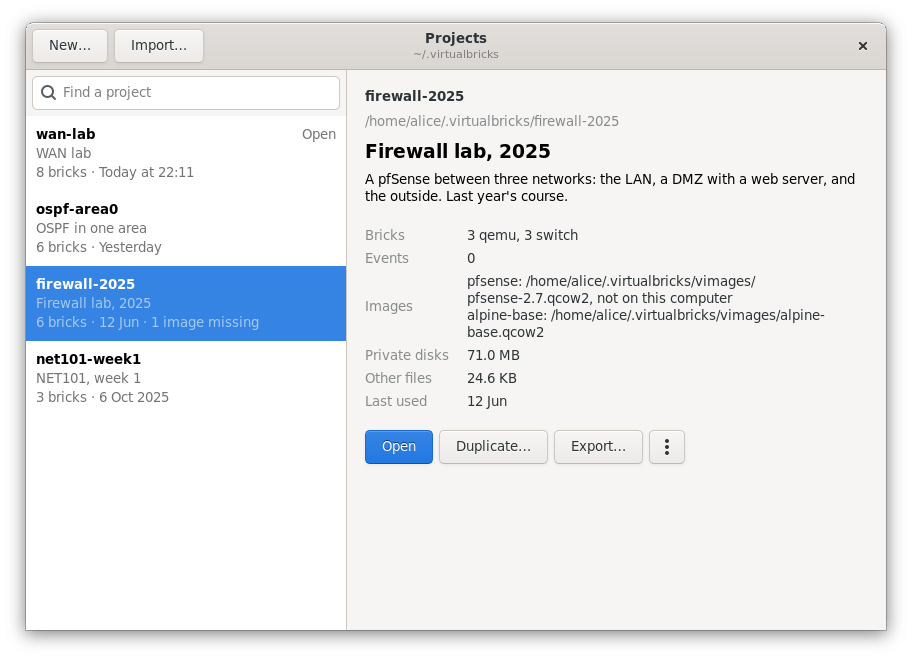
The image of firewall-2025 isn't on this computer: the list says so, and the details say which one. The picture was taken before the folder of the shared images was renamed: its paths say vimages, now shared_images.
- Open, New… and Rename…, with the name checked as you type: a name that is taken or not valid is refused before you press the button, not after.
- Duplicate… replaces Save As. It copies the project with its private disks, but not the images, and opens the copy unless you say otherwise.
- Remove… says what goes with the project, the folder and how much its private disks take, and offers to move it to the trash of your desktop, where you can restore it, or to delete it for good. The images it uses stay where they are. The open project can't be removed: open another one first.
- Show in Files opens the folder of the project.
- Export… and Import…, below.
If the project that was open last can't be opened at start-up, the Projects window opens and says why, instead of creating a new new_project_N.
The console has the same verbs, for a script or a lab without a display: project list, show, open, new, save, rename, duplicate and delete.
Exporting a project
An export writes the project to a single .vbp file that you can copy to another computer, send to a student, or keep. The Export window asks where to save it and what to put in it, each with its size:
- the project, its file and its README, always;
- the private disks of its machines, on by default;
- the images they are based on, off by default, because they are often gigabytes and the other computer may already have them;
- the other files of the project's folder, behind an expander.
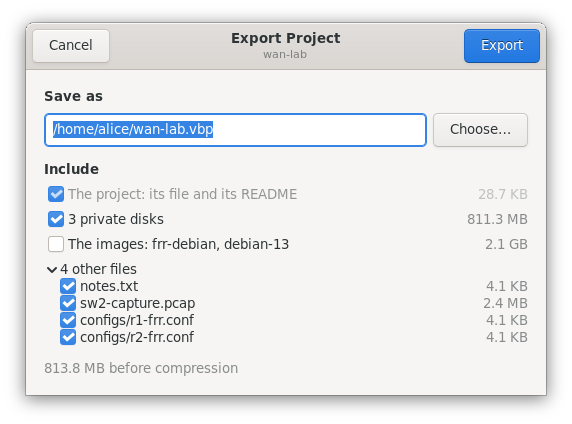
The private disks are in, the images out. The other files are behind the expander, opened here.
The export runs in a process of its own, at a lower priority, so the windows and the running bricks don't wait for it. It shows its progress in bytes, and you can stop it at any time, or close the window and let it finish: the Logs window says when it's done. It writes to a hidden file next to the destination and renames it at the end, so a stopped export leaves nothing behind, and an archive with the same name stays as it was.
Disks are packed. When qemu-img is installed, each qcow2 disk is compressed on its own, inside the archive, with qemu-img convert -c: with zstd since QEMU 5.1, with zlib before. A packed disk is still a qcow2 file that QEMU can run. qemu-img uses several cores, and the archive isn't gzipped around the disks. On our test lab, a 4 GiB image with 600 MiB of data and a private disk, the archive was about the same size as a gzipped one, 259 MiB instead of 244, and was written about twenty times faster. Without qemu-img, the whole archive is gzipped, as before.
Holes stay holes. A disk of 20 GB may hold 2 GB of data. The archive keeps the holes of sparse files, so an export doesn't store the zeros, and an import doesn't write them back.
No tool is required. 2.1 needed bsdtar, which isn't always installed. Virtualbricks 3.0 uses bsdtar when it's there, otherwise GNU tar, otherwise Python's own tarfile.
Importing a project
Import…, in the Projects menu or in the Projects window, asks for an archive and shows everything on one page:
- The name of the new project: the one in the archive, or the next free one, lab-2, if it's taken. An import never replaces a project.
- The README and the bricks of the project, so you know what you are importing.
- Each image the project uses, with a choice: Copy it from the archive to the shared images of the workspace, Use a file… of this computer, or Leave unset, for the disks to get an image later, in their settings. Every image has a default: one in the archive is copied, or found in the shared images when they already have a file with the same name and size; one that isn't in the archive uses the file at the same path, or the file of the shared images with that name.
- This computer's paths: the folders of QEMU and VDE of the project are replaced with yours when they don't exist on this computer.
- Open the project after the import, on by default.
Since every choice has a default, the Import button works from the start.
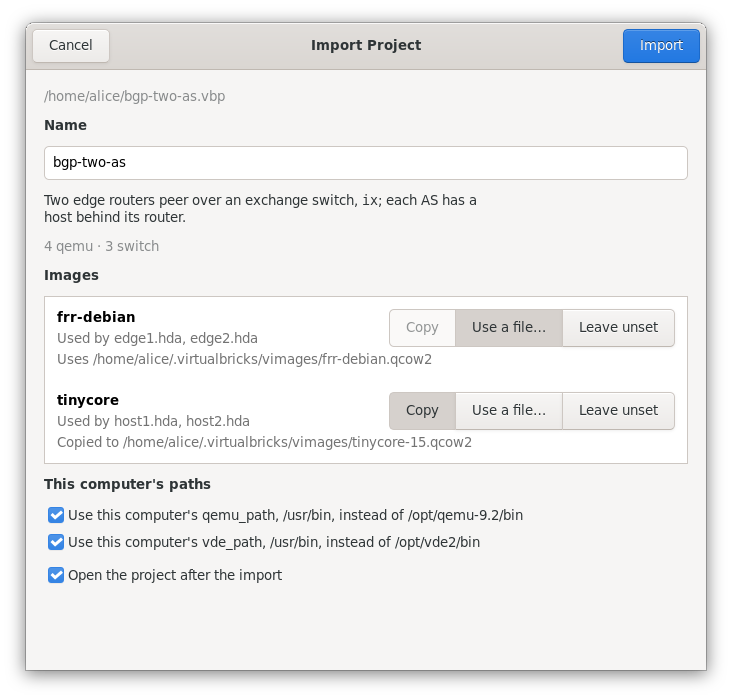
An archive from another computer. tinycore is in it, and is copied to the shared images; frr-debian isn't, and the file of the shared images with that name is used. The folders of QEMU and VDE of the other computer aren't here, and this computer's take their place. The picture was taken before the folder of the shared images was renamed: its paths say vimages, now shared_images.
Choosing an archive reads only its head, the list of its contents, the project file and the README, a few kilobytes, and stops there, however large the archive is. Then the import extracts the archive into a hidden folder of the workspace, copies the images to the shared images, points each private disk at its new image, unpacks the packed disks, and renames the folder into place. If you stop it, or if it fails, it removes what it wrote, the copied images included. At the end, the Logs window says what needs your attention: an image left unset, a disk that couldn't be rebased. The Import window closes then, whether the project opens or not.
The archives of 2.1 import too: their project file is converted on the fly, with the same code as the migration. Since they have no list of their contents, the page opens as soon as the project file is read, and the rest of the archive is scanned while you choose.
For now, Import and Export are greyed in the windows of a Virtualbricks that runs on another machine, opened with --connect: the archives stay on the machine they are on.
Inside a .vbp
A .vbp is a plain tar archive, in the pax format, so any tar can list it or extract it:
tar -tvf lab.vbp
The small files come first, then the larger ones, from the smallest to the largest:
contents.toml        the list of the other members
project.toml         the project
README.md
...                  the other files you chose
vm1_hda.cow          the private disks
IMAGES/debian        the images, by their name in the project
contents.toml says what the archive holds, the size of each member and whether it's packed:
format = 1

[[members]]
name = "project.toml"
size = 255

[[members]]
name = "README.md"
size = 16

[[members]]
name = "vm1_hda.cow"
size = 197120
packed = true
real_size = 196616
The process that writes and reads the archives can be run by hand, to look into an archive or to script an export: it reads a job in TOML and answers with one line of JSON for each step.
printf 'job = "inspect"\narchive = "lab.vbp"\n' |
    python -m virtualbricks.config.archive
The manual page virtualbricks-vbp(5) describes the format, and virtualbricks-archive(7) the process and its jobs.
Coming from 2.1
The first time Virtualbricks 3.0 starts, it converts the files of 2.1, once, and shows what it converted in a window:
- ~/.virtualbricks.conf becomes settings.toml and state.toml;
- the .project of each project becomes a project.toml next to it;
- the settings that now belong to a project, as the folders of QEMU and VDE, go into each project;
- the keys take their new names, and the commands of the events become actions: sw1 on becomes a start of sw1, and sw1 config numports=16 becomes brick set sw1 ports=16.
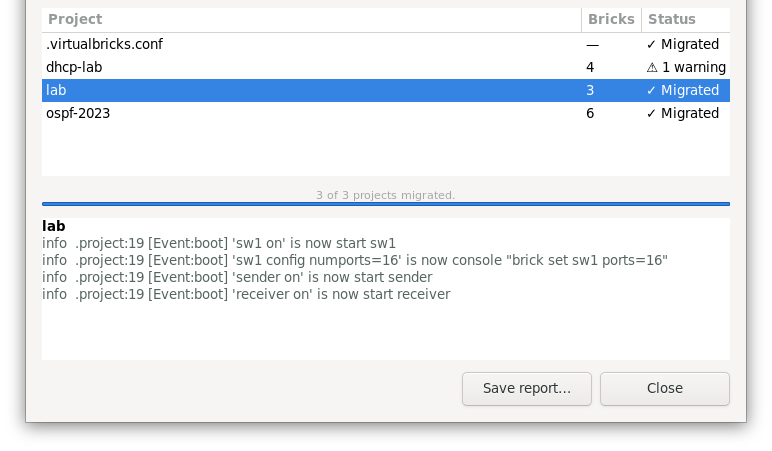
The events of lab became actions. A switch of dhcp-lab had 500 ports, more than a switch may have, and has 32 now.
The old files are left as they were. The report of the last migration stays in ~/.local/state/virtualbricks/migration-report.txt. Started with --workspace, Virtualbricks converts the projects of that folder in the same way.
To see what the migration would do before you upgrade, run it on copies, into a folder laid out like the XDG folders:
python -m virtualbricks.migrate --settings ~/.virtualbricks.conf \
    ~/vb-copy /tmp/vb-test
virtualbricks-migrate does the same in a window.
Try it
All of this is in the develop branch: the first post says how to install it. Export one of your labs, import it in another workspace, open its project.toml, and tell us what breaks on GitHub.